
How to edit talking head videos
A talking head video is just you, talking to the camera. That makes it fast to film and easy to get wrong in the edit: one static shot, long pauses and a slow start lose viewers quickly. This seven-step workflow turns a raw take into a video people watch to the end.
2 videos free to try with AI · Works in your browser · Also on iPhone and Android
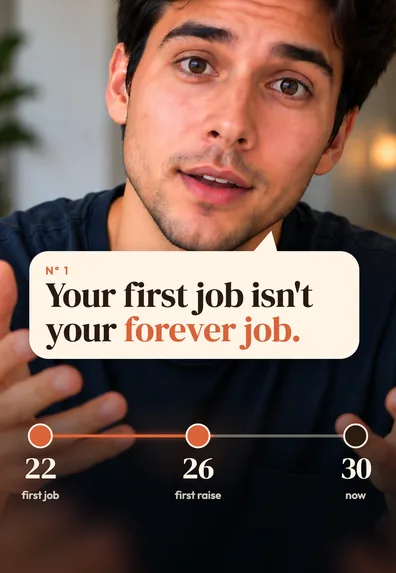


What makes talking head editing different
In most video, the pictures carry the story. In a talking head video, your words do, and the picture barely changes. That has two effects. Every wasted second is obvious, because nothing else is happening on screen. And the edit has to create the movement the camera didn’t: cuts, zooms, text and cutaways do the job a second camera would do on a film set.
Good talking head editing is therefore mostly about two things: removing (dead air, repeats, slow openings) and adding variety (zooms, B-roll, graphics, captions). The steps below follow that order.
The 7-step workflow
- Pick your takes. Watch everything once and mark the best take of each line. Delete the obvious false starts and the part before you started talking.
- Make the rough cut. Remove long pauses, “um”s and repeated sentences. This usually shortens a raw take by a fifth or more.
- Start on your strongest line. Cut the greeting and the throat-clearing. The first sentence the viewer hears should be the hook: the problem, the result or the surprising claim.
- Change the picture every few seconds. Use zoom punch-ins on key lines, B-roll of what you are describing, and simple graphics for numbers and lists.
- Add captions. Add captions after the cut so they match the final timing. Keep them short, bold and away from your face.
- Fix the sound. Make the voice clear and even, reduce background noise, and keep any music well below your voice.
- Export vertical and check on a phone. Export 9:16 at 1080 × 1920, then watch it on your phone with the sound off and on before posting.
Details that make the difference
Rough cut: be stricter than feels natural
When you watch your own footage, pauses feel short because you remember what you were thinking. A viewer just sees a frozen face. Cut every pause longer than a breath, unless it sets up a punchline. If you said a line twice, keep the better one even if it was the first. Our guide to removing “um” covers the cutting technique in detail.
Zooms: the cheapest way to add movement
Push in 10–20% on an important sentence, then go back to the wide framing on the next cut. Alternating framing also hides the small jump that every cut creates. Avoid slow, constant zooms through the whole video; they make viewers seasick instead of focused.
B-roll and graphics: show what you say
If you mention a product, an app, a place or a number, show it. A two-second cutaway is enough. Screen recordings, photos of your own work and simple number graphics all count. If you are new to the idea, read what B-roll is and how to use it.
Captions: after the cut, not before
Captions made before you cut will drift out of sync. Add them last, keep them to a few words at a time, and highlight the key word in each line. Keep them off your mouth and eyes; chest height usually works.
Sound: clear voice beats loud music
Viewers forgive soft picture quality much faster than bad audio. Reduce room echo and background hum, keep your voice level steady from start to end, and set music low enough that you could follow the words with your eyes closed.
Editing a talking head video in CapCut, Premiere or a phone app
The workflow is the same in any editor; only the buttons differ. In CapCut or another phone editor, you split and delete on the timeline for the rough cut, add a zoom with keyframes or a zoom effect, add captions from the text menu, and export at 1080p. In Premiere Pro or DaVinci Resolve, transcript-based editing speeds up the rough cut, and an adjustment layer handles zooms. A timeline editor gives you full control, but the rough cut alone can take longer than filming did.
Filming tips that make the edit easier
- Camera at eye level, lens clean, phone locked in a stand.
- Light in front of you, such as a window, not behind you.
- A plain background with some depth, a shelf or a plant a few steps behind you, looks better than a flat wall.
- Pause for a beat between lines. Clean gaps are easy to cut; words that run into each other are not.
- Say a line again if you stumble, right away. It is easier to pick between two takes than to patch one.
Mistakes to avoid
- Opening with “Hey guys, so today I want to talk about…”. Start with the point.
- Leaving the same framing for 30 seconds or more.
- Captions that cover your face or sit under the app’s buttons.
- Music louder than your voice.
- Exporting horizontal for TikTok, Reels or Shorts.
The SparkRoll way
SparkRoll is an AI video editor built for exactly this kind of video. Add your talking clip and it does the first pass of the workflow for you: the clean cut removes pauses, filler words and retakes, then Auto edit makes three complete edits with captions, a hook, zooms and effects for you to pick from.
From there you change it by talking or typing, like briefing an editor: “add a hook at the start”, “zoom in when I say the price”, “put my photo of the kitchen here”. Graphics follow what you say, so a price counts up on screen and a percentage draws as a ring chart. Every tool also works by hand.
- 160 templates for advice, coaching, UGC, real estate, food and more.
- 90 caption styles, kept off your face.
- B-roll from your own photos, music and sound effects, voice clean-up.
- Vertical 9:16 export for TikTok, Reels and Shorts.
Try it on 2 videos free with AI. More on the talking head video editor page, and if you need topics, see our talking head video ideas.
Questions, answered
How do I edit a talking head video?
Cut the pauses and repeats, start on your strongest line, add zooms and B-roll so the picture changes every few seconds, add captions after the cut, clean the audio and export vertical.
How do I edit talking head videos in CapCut?
Split and delete on the timeline to remove pauses, add keyframed zooms on key lines, use the text menu for auto captions, and export at 1080p in 9:16. The same steps work in any timeline editor.
How long should a talking head video be?
As long as the point needs and no longer. For TikTok, Reels and Shorts, many talking videos land between 20 and 60 seconds after the rough cut.
How do I make a talking head video less boring?
Change something on screen every few seconds: a zoom, a cutaway, a graphic or a highlighted caption word. And start with the hook, not a greeting.
What is the best background for a talking head video?
A tidy space with some depth and soft light from the front. Avoid a bright window behind you, which turns you into a silhouette.
Ready to edit by talking?
Upload a clip, say what you want, and get a finished edit. 2 videos free to try.
Get the app: App Store · Google Play